본 글은 정확하지 않을 수 있습니다. 참고용으로만 봐주시면 감사하겠습니다.
spring rest docs 공식 사이트
https://spring.io/projects/spring-restdocs
spring boot 2.7.5
gradle 7.6
Junit5
MvcMock
도구 선정
스프링에는 문서화를 도와주는 도구로 크게 Spring REST Docs와 Swagger가 존재한다.
| Swagger | Spring REST Docs | |
| 장점 | 1. 동적 api 문서 페이지를 제공하여 직접 요청을 보내 테스트할 수 있다. 2. 문서 적용이 간단하다. |
1. 운영 코드에 영향을 주지 않는다. 2. 테스트 코드를 성공해야 문서를 작성할 수 있다. (테스트 강요) |
| 단점 | 1. 운영 코드에 문서관련 로직을 추가해야 된다. | 1. 테스트 코드를 강요하기 때문에 작업량이 늘어난다. 2. 세팅 작업이 어렵다. |
각각의 도구에는 장단점이 존재하며 어느 도구가 더 좋다는 결론을 내릴 수 없었다. 하지만 운영 코드에 로직을 추가해야 되는 Swagger의 단점이 나에게는 크게 다가왔기 때문에 우리 프로젝트에서는 Spring REST Docs를 적용하기로 했다.
+ 테스트 코드를 강요하기 때문에 테스트 코드를 제대로 작성할 수 있는 기회라고도 생각했다.
Spring REST Docs 설명
spring REST Docs에 대한 설명이다.
It combines hand-written documentation written with Asciidoctor and auto-generated snippets produced with Spring MVC Test.
번역(파파고) : Asciidoctor로 작성된 수기 문서와 스프링 MVC 테스트로 제작된 자동 생성 스니펫을 결합한 것이다.
이미 한 번 Spring REST Docs를 사용한 입장에서 보면 이해가 되는 글이지만, 처음 이 글을 봤을 때는 정말 하나도 이해할 수 없었다. Asciidoctor이 뭐고, 스니펫은 또 뭔지..
이를 이해하기 위해 먼저 문서가 생성되는 방식을 간단히 알아보자.
- Controller 테스트 코드에 Spring REST Docs 관련 로직 추가
- 테스트 코드 실행
- api 문서 작성
- 빌드
1. Controller 테스트 코드에 Spring REST Docs 관련 로직 추가
.andExpect(status().is2xxSuccessful())
                .andDo(document("post/findOne",
                        preprocessRequest(prettyPrint()),
                        preprocessResponse(prettyPrint()),
                        responseFields(
                                fieldWithPath("id").description("게시글 id"),
                                fieldWithPath("member.id").description("작성자 id"),
                                fieldWithPath("member.nickname").description("닉네임"),
                                fieldWithPath("content").description("내용"),
                                fieldWithPath("viewCount").description("조회수"),
                                fieldWithPath("likeCount").description("좋아요 개수"),
                                fieldWithPath("isOwner").description("본인 게시글 여부"),
                                fieldWithPath("isLike").description("게시글 좋아요 여부"),
                                fieldWithPath("createDate").description("생성 날짜"),
                                fieldWithPath("modifyDate").description("수정 날짜")
                        )
                ));
기존에 작업한 controller 테스트 코드에 아래와 같이 api 명세화에 필요한 로직을 추가해 준다.
2. 테스트 코드 실행
테스트 코드가 성공하면 build 폴더 아래에 아래와 같은 파일이 생성된다.

Spring REST Docs의 설명 중 "MVC 테스트로 제작된 자동 생성 스니펫" 이 있었다. 위의 파일들을 스니펫이라 부른다.
스니펫 = 문서조각
우리는 위의 7개의 파일 중 필요한 파일들만 조합하여 api명세서를 만들어 줄 거다.

3. api 문서 작성
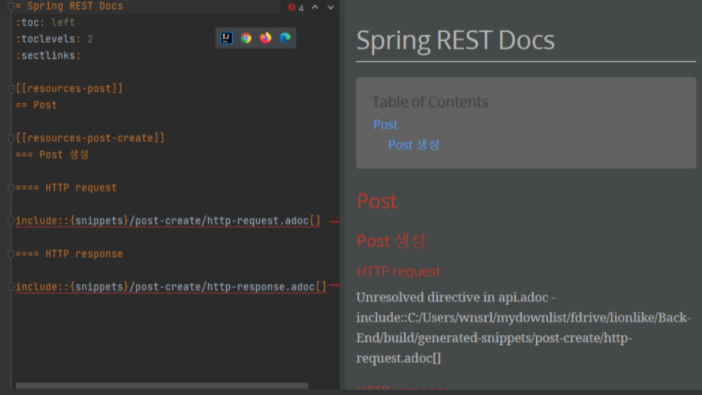
src/docs/asciidoc/{파일이름}.adoc 를 만들어 준다.

우리가 볼 api 명세서를 스니펫을 이용하여 만들어 준다.
// 1~ 8줄은 api 명세서를 보기 좋게 꾸며주는 로직이다.
= Spring REST Docs
:doctype: book
:icons: font
:source-highlighter: highlightjs
:toc: left
:toclevels:2
:sectlinks:

[[resources-post]]
= 게시글

== 1. 글 상세 보기

==== HTTP request

include::{snippets}/post/findOne/http-request.adoc[]  // 스니펫 조각 불러오는 로직

==== HTTP response

include::{snippets}/post/findOne/http-response.adoc[] // 스니펫 조각 불러오는 로직
4. 빌드
bootJar 빌드를 실행하면,

결과적으로 우리가 보게 될 api 명세서가 생긴다.

실제 적용
간단하게 돌아가는 방식을 알아봤다. 이제 실제로 프로젝트에 Spring REST Docs를 적용해 보자.
1. 빌드 구성
plugins {
	// [spring rest docs] : Asciidoctor 플러그인 적용
	id "org.asciidoctor.jvm.convert" version "3.3.2"
}

configurations {
	// [spring rest docs] : Asciidoctor를 확장하는 종속을 위한 구성
	asciidoctorExt
}

dependencies {

	// [spring rest docs]
	// asciidoctor 사용
	asciidoctorExt 'org.springframework.restdocs:spring-restdocs-asciidoctor:{project-version}'
	// mockMvc 를 사용하여 restdocs 하도록
	testImplementation 'org.springframework.restdocs:spring-restdocs-mockmvc:{project-version}'
}

ext {
  // [spring rest docs] : snippet 출력 위치 변수 선언
	snippetsDir = file('build/generated-snippets')
}

test {
  // [spring rest docs]
	outputs.dir snippetsDir
}
// [spring rest docs] : asciidoctor 환경설정
asciidoctor {
	inputs.dir snippetsDir
	configurations 'asciidoctorExt'
	dependsOn test // 문서가 생기기 전에 테스트 작업 먼저 실행되도록 종속 설정
}

bootJar {
	// [spring rest docs] : jar 파일에 패키징, 정적 콘테츠로 제공
	dependsOn asciidoctor // jav가 빌드되기 전에 문서가 먼저 실행되도록 종속 설정
	copy {
			from asciidoctor.outputDir             // 해당 위치를
			into "src/main/resources/static/docs"  // 여기로 이동
	}
}
gradle 설정 관련은 좀 더 공부를 해봐야 될 거 같다...
나는 대략적으로 위에서 본 "문서가 생성되는 방식"의 흐름으로 구성된다고 이해했다.
2. 테스트 세팅
공식 문서에 나온 대로 구성하면 아래와 같다.
@ExtendWith(RestDocumentationExtension.class)
public class PostControllerTest {
    @Autowired
    private MockMvc mvc;
    @BeforeEach
    void setUp(WebApplicationContext webApplicationContext, RestDocumentationContextProvider restDocumentation) {
        this.mockMvc = MockMvcBuilders.webAppContextSetup(webApplicationContext)
                .apply(documentationConfiguration(restDocumentation))
                .build();
    }
}
세팅 방법을 좀 더 찾아본 결과
@AutoConfigureRestDocs // 사실상 이거만 붙이면 됨
public class PostControllerTest {
}
자동으로 세팅해 주는 어노테이션이 있어서 해당 어노테이션만 추가해 주었다.
3. 테스트 코드 작성
보고 싶은 api문서가 있을 경우 이에 대한 controller 테스트 코드를 작성해줘야 한다.
게시글 상세 페이지 요청에 대한 테스트 코드를 예시로 보면
    @Test
    @DisplayName("게시글 상세 조회를 성공한다.")
    void findPost_success() throws Exception {

        // when
        ResultActions resultActions = mockMvc.perform(get("/boards/1/posts/1")
                        .accept(MediaType.APPLICATION_JSON)
                        .contentType(MediaType.APPLICATION_JSON))
                .andDo(print());;

        // then
        resultActions
                .andExpect(status().is2xxSuccessful())
                .andDo(document("post/findOne",                    // 스니펫 생성 위치
                        preprocessRequest(prettyPrint()),          // 줄 바꿈 생기게 출력
                        preprocessResponse(prettyPrint()),         // 줄 바꿈 생기게 출력
                        responseFields(                            // response body값
                                fieldWithPath("id").description("게시글 id"),
                                fieldWithPath("member.id").description("작성자 id"),
                                fieldWithPath("member.nickname").description("닉네임"),
                                fieldWithPath("content").description("내용"),
                                fieldWithPath("viewCount").description("조회수"),
                                fieldWithPath("likeCount").description("좋아요 개수"),
                                fieldWithPath("isOwner").description("본인 게시글 여부"),
                                fieldWithPath("isLike").description("게시글 좋아요 여부"),
                                fieldWithPath("createDate").description("생성 날짜"),
                                fieldWithPath("modifyDate").description("수정 날짜")
                                // !! field값을 실제 예상되는 반환 데이터와 동일하게 작성해줘야 한다.
                                // !! 그러지 않을 경우 오류가 발생한다.
                        )
                ));
    }
만약 필드 값이 하나라도 빠지거나, 필드명이 잘못되었을 경우 오류가 발생한다.

4. 문서 작업
(위에 작성한 "문서가 생성되는 방식" 2,3,4와 거의 동일)
테스트 코드가 성공적으로 실행되면, 스니펫 파일이 생성된다.

우리는 http-request와 http-reponse를 사용한다.
이제 src/docs/asciidoc/{파일이름}.adoc 을 생성하고 스니펫을 조합하여 문서를 꾸며주면 된다.
+ AsciiDoc plugin 설치하면 인텔리제이 안에서 바로바로 결과화면을 확인할 수 있다.
다 작성되었으면 build/bootJar를 실행하면 된다. 빌드가 완료되면 결과물인 html파일이 제공된다.
주의 : static/docs 폴더를 생성하지 않으면 html 파일이 생성되지 않는다.
이제 이 파일을 어찌어찌하여 프론트 개발자에게 전달하면 된다. (아마도..)
사용 후기
Spring REST Docs의 장점과 단점을 모두 느낄 수 있었다.
테스트 코드에만 로직을 추가시키며 테스트 코드를 신경 써서 작성해 줘야 되는 부분은 좋았지만, 처음 세팅하는 과정이 생각보다 어려웠고 테스트 코드에 추가되는 문서 관련 로직이 생각보다 양이 많고 노가다? 작업 같았다.

위 코드처럼 일일이 추가하는 작업을 하고 있는데 이게 맞는 방식인지 잘 모르겠다.
이 부분에 대해서는 한 번 찾아봐야 될 거 같다.
+ 찾아보니 swagger와 spring rest docs를 합치는 방식도 있다.
참고자료
https://techblog.woowahan.com/2597/
Spring Rest Docs 적용 | 우아한형제들 기술블로그
{{item.name}} 안녕하세요? 우아한형제들에서 정산시스템을 개발하고 있는 이호진입니다. 지금부터 정산시스템 API 문서를 wiki 에서 Spring Rest Docs 로 전환한 이야기를 해보려고 합니다. 1. 전환하는
techblog.woowahan.com
https://docs.spring.io/spring-restdocs/docs/current/reference/htmlsingle/
Spring REST Docs
Document RESTful services by combining hand-written documentation with auto-generated snippets produced with Spring MVC Test or WebTestClient.
docs.spring.io
+우테코 깃 레포를 많이 참고하셨습니다.
댓글